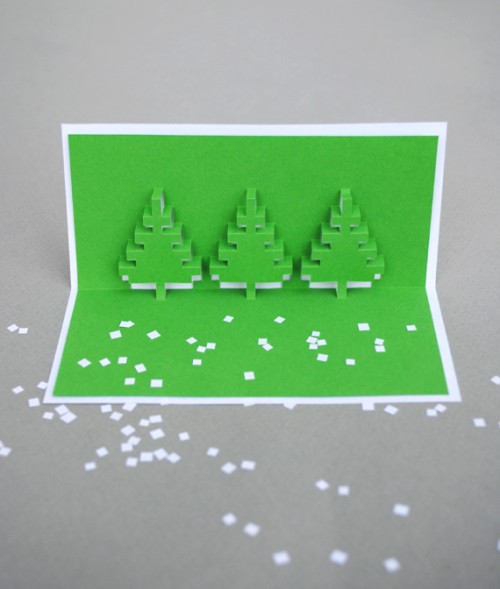
Kate, at minieco, has directions for making this winter popup card (plus several variations) here.
![]()
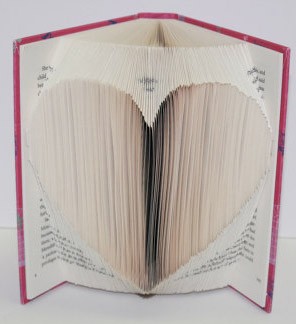 John Green makes what he calls “book origami” — he “up-cycle(s) old books and make them into pieces of art. (He) can make words, symbols and designs just by folding the pages.” You can see some of his designs in his Etsy shop. He also has a how-to ebook that includes templates and patterns you can make yourself.
To house my book, my friend Cathy suggested a slipcase construction that was invented by Denise Carbonne. Here’s briefly how to make one.
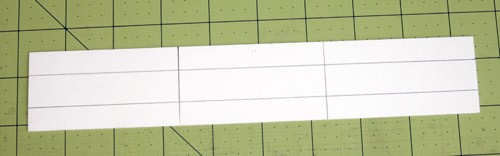
Start with 3 pieces of paper. One piece is folded to form the slipcase top, spine and bottom. Two other pieces make the sides of the case. The spine piece length is (2 * the width of the book) + the length of the book. The width of the spine piece is the width of book + 1 inch. The side pieces are (2 times the book width) by the book height. These numbers will need to be adjusted a bit depending on the thickness of the material used to make the slipcase.
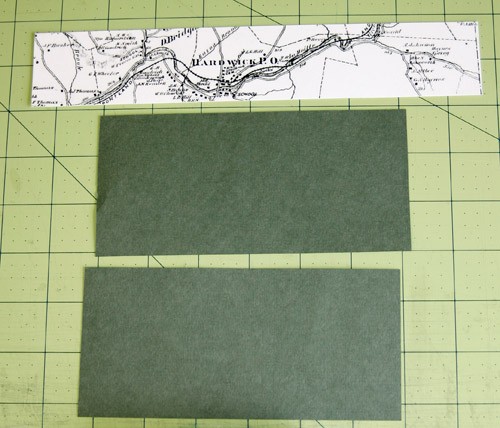
My book is 3″x3″x.5″. The spine piece (top of photo above) is 9.25″x1.625″. The 2 lower pieces of paper are 6″x3″. (Because of the paper I’m using, and to allow the book to go in and out of the case easily, I needed to add 1/8″ to dimension of the book — width, height, and length.)
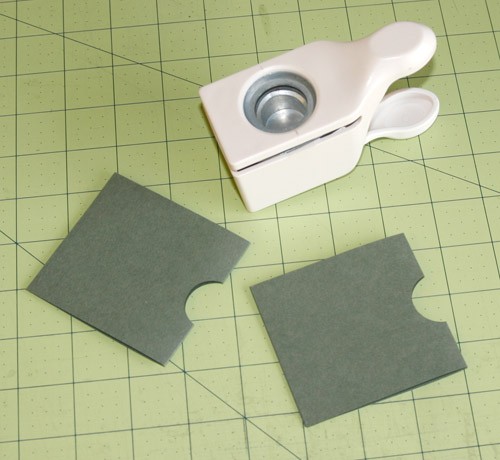
Next I folded the side pieces in half and used a 1″ round hole punch to make half holes in the folded edge of the paper. This will make it much easier to grasp the spine of the book and remove it from the slipcase.
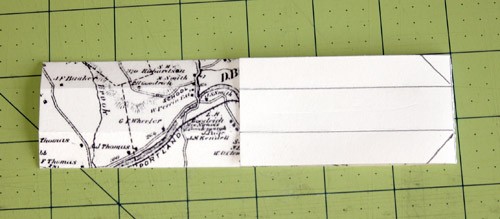
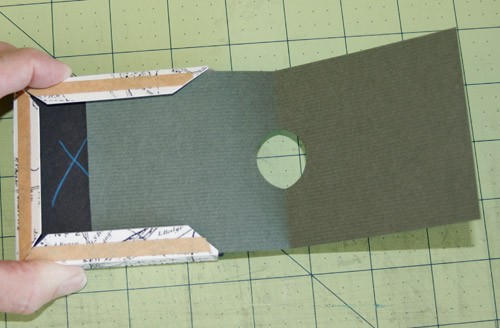
Prepare the spine piece by scoring 1/2″ from either long edge. Then score the width of the book from either end (in my case, this is 3-1/8″ from either end). I’ve drawing the score lines on the opposite side of the spine piece in the photo below.
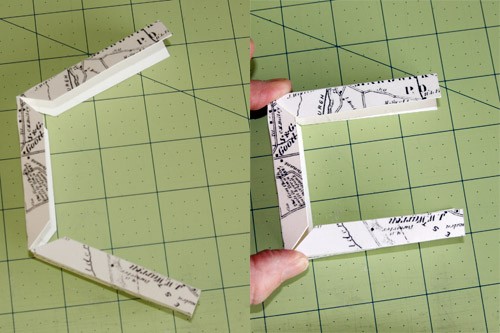
Fold along the scores and then fold one end over and miter each edge — see photo below.
The miters allow the paper to fold to form the spine, top and bottom of the slipcase
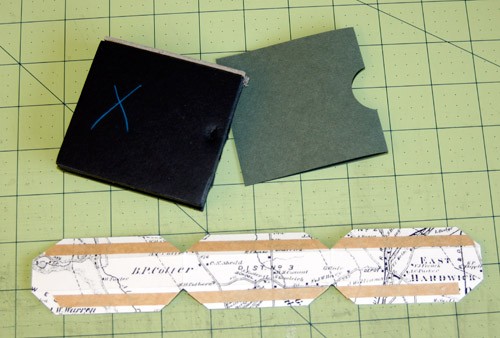
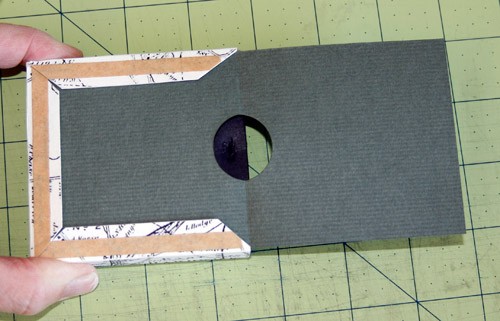
Using several pieces of foam core, I made a block that is the same size as my book. This makes it easier to attach the side pieces to the spine. Instead of using glue, I used 3M 415 double-sided tape. It’s got a backing on one side, so I could get everything positioned and then adhere it, without worrying about glue drying or getting all over everything. The tape goes along the 2 horizontal scores on both sides (front and back) of the spine piece. Here’s a picture of the spine piece, my foam core block and one of the side pieces.
In the next photo, I’ve positioned the foam core block inside the folded spine piece. Then I slipped in the open side piece of paper. I haven’t removed the backing on the tape yet.
Once I’ve got everything positioned, I remove the tape backing and press down the spine piece so the mitered edges meet. In the photo below, I’ve removed the backing between the spine piece and the side piece and boned them down. This step is a bit tricky, as the spine piece has a tendency to creep out at the far edge (where the book would be inserted), so I had to be mindful that I kept everything tight as I adhered them.
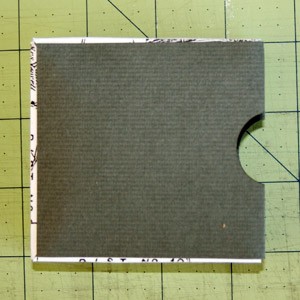 Now I remove the backing on the tape on the top, fold over the side piece and adhere it. That finishes the first side. Turn over the slip case and adhere the second side piece, remove the foam core block, slip in a finished book, and I’m done.
I used 80 lb cover stock for the spine piece, printed with the same map as on the cover of my book. For the side pieces, I used Bugra paper (which is the same color as the book cloth I used for the book’s spine).
Felt & Wired did a nice write-up about my friend Cathy’s blog Bookmaking with Kids. Cathy’s posted dozens of book-centric projects suitable for kids and teachers, categorized by age, structure and subject. Take a look at the interview here or read Cathy’s blog here.
 After making a tunnel book for my last prompt challenge word, I spent some time looking at other tunnel books as well as directions. Here’s some of what I found:
![]() A tunnel or peephole book is a set of pages bound into accordions on two sides and viewed through a central opening. Scenery or shapes are cut out of the pages and then assembled in layers. Inspired by theatrical stage sets, this book form dates from the mid-eighteenth century and continues to be popular.
A tunnel or peephole book is a set of pages bound into accordions on two sides and viewed through a central opening. Scenery or shapes are cut out of the pages and then assembled in layers. Inspired by theatrical stage sets, this book form dates from the mid-eighteenth century and continues to be popular.
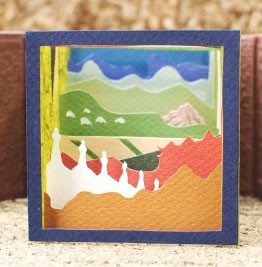
![]() The photo is of Kara Russo’s Tibet as I Remember It — I especially liked this one as it uses color and shape in much the way I tried to use them in my own recent model.
The photo is of Kara Russo’s Tibet as I Remember It — I especially liked this one as it uses color and shape in much the way I tried to use them in my own recent model.
![]() I made my book using an accordion spine on the left and right, made out of thin white Japanese paper so light would come through the sides. The National Museum of Women in the Arts has PDF directions for this sort of structure.
I made my book using an accordion spine on the left and right, made out of thin white Japanese paper so light would come through the sides. The National Museum of Women in the Arts has PDF directions for this sort of structure.
![]() Ed Hutchins has instructions for a slightly more involved, one sheet tunnel book. On his website, his article Exploring Tunnel Books includes a history of tunnel books and a photo gallery of example books. There are good discussions of what makes the structure a book, rather than a novelty piece, how various artists have adapted the form, and how one might incorporate text.
Ed Hutchins has instructions for a slightly more involved, one sheet tunnel book. On his website, his article Exploring Tunnel Books includes a history of tunnel books and a photo gallery of example books. There are good discussions of what makes the structure a book, rather than a novelty piece, how various artists have adapted the form, and how one might incorporate text.
![]() Book artist and teacher Carol Barton has been instrumental in popularizing tunnel books with book artists. She has a gallery of tunnel books on her website.
Book artist and teacher Carol Barton has been instrumental in popularizing tunnel books with book artists. She has a gallery of tunnel books on her website.
![]() Beth Lee has a nice list of links to tunnel books she likes.
Beth Lee has a nice list of links to tunnel books she likes.
![]() Rand Huebsch wrote an article for the Bone Folder on tunnel books.
Rand Huebsch wrote an article for the Bone Folder on tunnel books.
![]() And lastly, click here to see all the tunnel book images Google has collected.
And lastly, click here to see all the tunnel book images Google has collected.
 Folding the turkish map fold with a non-square piece of paper isn’t as straight-forward as with a square sheet. So for completeness, I’ve put directions for using a rectangular piece of paper here.