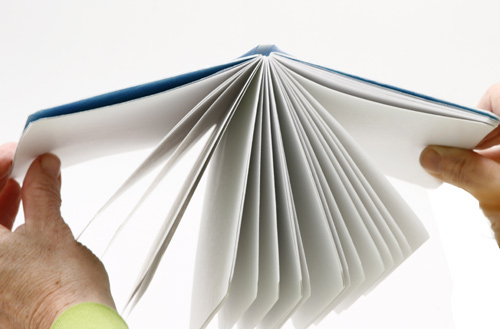
Quick and easy, the double-fan adhesive or millennial binding is a great solution for turning single sheets into an extremely durable paperback book that opens flat and stays open. Its strength comes from the way the pages are glued, using a double-fanning technique that brings glue just a millimeter or so into the textblock. And its “openability” comes from a pop-off spine that moves independently of the textblock.
![]() I learned this method from notes by Dominic Reilly, who learned it from Gary Frost. Currently conservator for the libraries at the University of Iowa and author of the Future of the Book blog, Frost is renowned for devising conservation bindings based on enduring mechanical features of historic bindings that he has “deconstructed” and reproduced. In this particular structure, he sought not only to protect a book’s contents and ensure that it opened flat for easy reading but also to incorporate such modern materials as transfer tape and Tyvek and accommodate laser-printed copies and production editioning methods.
I learned this method from notes by Dominic Reilly, who learned it from Gary Frost. Currently conservator for the libraries at the University of Iowa and author of the Future of the Book blog, Frost is renowned for devising conservation bindings based on enduring mechanical features of historic bindings that he has “deconstructed” and reproduced. In this particular structure, he sought not only to protect a book’s contents and ensure that it opened flat for easy reading but also to incorporate such modern materials as transfer tape and Tyvek and accommodate laser-printed copies and production editioning methods.
![]() I’ve adapted this structure for my food & exercise diary and Sherlock Holmes notebooks. it’s good for anything that needs to open flat — like a calendar or day planner. It can also be used to rebind a favorite paperback book. While it’s an easy book to make, please note that you’ll need access to a guillotine (stack paper cutter) to give the book a final trim.
I’ve adapted this structure for my food & exercise diary and Sherlock Holmes notebooks. it’s good for anything that needs to open flat — like a calendar or day planner. It can also be used to rebind a favorite paperback book. While it’s an easy book to make, please note that you’ll need access to a guillotine (stack paper cutter) to give the book a final trim.
- Materials & Equipment
- Gluing up the spine
- Attaching the covers
- Generalized measurements
- A few notes and resources
These directions are for a book of approx. 4¼” by 5½” by ¼” thick, before trimming. For all materials used in the book, the grain should be parallel to the spine, or 5½” dimension.
- 1 textblock of single sheets, 4¼” by 5½” pre-printed (with the first and last pages blank)
- 2 endsheets, 8½” by 5½”. I orginally learned to make this book with Tyvek endsheets, but colored text-weight paper (not cover stock) also works
- 1 spine covering, 1¼” by 5½”, made from Tyvek or Jpanese mending paper.
- 2 pieces of cover stock, 4¼” by 5½”
- 1 spine piece, made of cover stock, 1¼” by 5½”
- 1 cover, made of Tyvek, decorative paper or bookcloth, 8-7/8″ by 5½”. I made my first double-fanned adhesive books with painted Tyvek covers. My current technique is to cover the textblock with plain Tyvek, then cover it again with decorative paper. The Tyvek makes the book stronger, especially in the areas it gets most wear — the joints next to the spine
Equipment you’ll need: waxed paper, bone folder, straight edge/ruler, white glue (PVA if you have it), scrap paper, glue brush or small sponge paint roller, X-acto knife, weights (heavy book will do), guillotine for final trim. You’ll also need a way to hold the textblock together while you glue the spine — see Step 1 below.
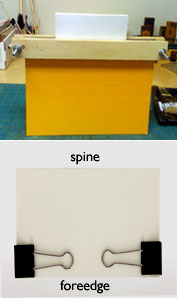
- Jog the textblock edges on your work surface to even up all the pages. You’ll need to keep the textblock together while you glue the spine. To do this you can
- put it in a finishing press, spine end up, with about 1/3 of it sticking out. You can make a simple finishing press using these directions.
 If you don’t have a finishing press, attach binder clips to the head and tail of the textblock edge. Either stand the block up, balanced on the open binder clips, or lay the textblock on the work surface with the spine extended out over the edge of the table, weighted so that it won’t move while you glue.
Whichever method you use, be sure to check carefully that the spine is even, straight and square.
- Fan the pages over to one side. The textblock should be fanned evenly so all the pages are ever-so-slightly exposed. Work glue (undiluted PVA) onto the surface with a brush or a small sponge paint roller.
- Fan the pages the other way and brush on the glue again.
- With the textblock upright, squeeze the spine between your fingers to remove any excess glue. Smooth the spine with your finger. Let the glue set up for a few minutes.

- Take the textblock out of the press, wrap it in waxed paper, put it under weight and let it dry.
- Fold each 8½” by 5½” endsheet in half lengthwise. For the first sheet, brush a bead or very thin line of glue next to the folded edge on one side only. Tip the glued side onto the front of the textblock about 1/16″ back from the spine edge. Repeat with the second endsheet, attaching it to the back of the textblock. Bone down the endsheets.

- Put the textblock back in the finishing press, spine end up. Glue up one side of the 1¼” by 5½” spine covering, aligning it with the head and tail of the textblock and centering it so that ½” falls on each side of the spine. Work the spine covering into the spine and endsheets with your bone folder and fingers.

- Take the book out of the press, wrap it in waxed paper, put it under weight and let it dry.
Making and attaching the cover
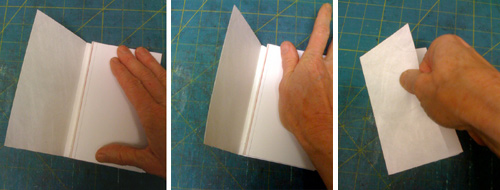
- Here’s how to create centered folds in your cover to fit the spine of the textblock exactly: Measure the width of your spine, W” (in our case, ¼”). Make a mark at the top and bottom of the short end of the sheet W” (¼”) from the edge. Fold the opposite short edge to the mark and use your bone folder to get a crisp fold.
Turn the sheet around and repeat. Now you have two parallel folds exactly in the middle of the cover, which will wrap perfectly around the spine of your textblock.
- Glue up the 1¼” by 5½” spine piece and lay it onto the spine fold in the cover. Be sure it is straight and bone it down well.
 attached to tyvek cover (white)")
On left: step 1: fold short end to marks to get the spine fold. On right, step 2, the spine piece is glued into the spine fold.
- Glue one side of the first piece of cover stock (4¼” by 5½”). It is to be attached to the endsheet on one side of the textblock, 1/16″ from the spine edge. Start laying the cover stock down from the spine edge toward the foreedge, smoothing with your fingers and bone folder as you go. Repeat with the other piece of cover stock and other side of the textblock. Put the textblock under a weight and let it dry.
- Using a pencil and straight-edge, draw a line on the cover stock parallel to and about ¼” from the spine edge. Do this on both front and back sides. This ¼” by 5½” area will not be glued, allowing the cover to pop away from the spine as the book opens.
- Put a piece of scrap paper between the back cover stock and endsheet. Masking the ¼” by 5½” area at the spine edge, apply a thin layer of glue to the back cover stock. Remove the scrap paper.

- Lay the 8-7/8″ by 5½” cover on your work surface, colored/decorated side face down. Place the glued-up side of the textblock onto the cover, aligned with and to the right of the spine piece. Press on the textblock gently with your palm to set the cover in place.
Immediately repeat with the front other cover, pulling snug and square against the textblock. (Don’t forget: put a piece of paper between the cover stock and endsheet before applying glue; and don’t put any glue in the ¼” by 5½” area at the spine edge.)
- Put waxed paper between the endsheets at both front and back (so excess glue doesn’t stick to anything) and press under light weight until dry.
- You’re almost done. Trim the book in the guillotine. Do a minimal trim, taking off as little as possible, starting with the foreedge, and then the head and tail.
 To the left are books that I’ve made using this technique. I covered the spine with a piece of red paper, and then added decorative paper over the Tyvek. To the left are books that I’ve made using this technique. I covered the spine with a piece of red paper, and then added decorative paper over the Tyvek.
|
For a book W” x H” x S” thick (before trim):
1 textblock of single sheets, W” by H” by S” thick
2 endsheets, (Wx2)” by H”
1 spine covering (S+1)” by H”
2 pieces of cover stock, W” by H”
1 spine piece, S” by H”
1 cover, (S + Wx2 + 1/8)” by H”
Grain direction
Tyvek doesn’t have a discernible grain direction. For the cover stock, spine piece and textblock paper, it’s important that they all have the same gtrain direction, running parallel to the spine. On most paper, such as 8½” by 11″ printer paper, the grain is parallel to the long side. To make a book 5½” by 8½”, you can’t just chop or fold printer paper in half; the grain will be in the wrong direction. However the grain direction for the 4¼” by 5½” in these directions is just right for printer (letter-sized) paper.
Glue for the spine
While you can use regular white glue for the fan gluing part of the procedure, PVA (polyvinyl acetate) is better. PVA is an extra strong white glue and is available in small bottles online at Hollander’s, Daniel Smith and Dick Blick amoung others. Or buy in larger quantities from Colophon Book Arts Supply or Talas Online .
Rebinding a paperback book
To use this technique to rebind an existing perfect bound book, first chop off the existing spine (which will also remove the covers) with a guillotine. Be sure the book is square in the guillotine — old worn paperbacks often aren’t square and the spine will come off on an angle. Cut the new covering material a bit bigger than the resulting text block and trim them once you have rebound the book.
Other resources
- Gary Frost’s transfer tape binding is described here and here.
- Pete Jermann has a tutorial for a similar method, another for rebinding a paperback, plus a page of related How-Tos using fanned adhesive bindings. He also sells a fan-gluing press, an aligning device for making fan-glued bindings.
- Indiana University has instructions for rebinding a paperback using the double-fan method.
- Atomic Publishing sells several machines for making perfect bound books, using hot glue. There’s a video on the website showing how it works.